 Save
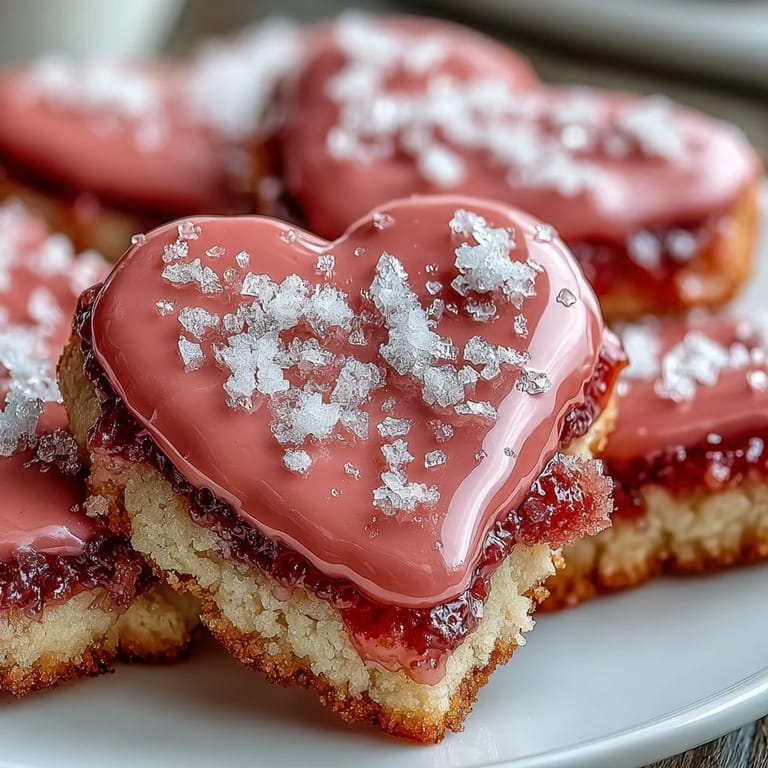
Save My sister called me in a panic two days before Valentine's Day, asking if I could make cookies for her office exchange. I hadn't baked in months, but something about the urgency—and the idea of strawberry-filled hearts—pulled me into the kitchen with an enthusiasm I didn't expect. The freeze-dried strawberries arrived that afternoon, and the moment I opened the bag, their bright, concentrated aroma filled my whole apartment. It felt like spring had shown up early, whispering that maybe I was exactly where I needed to be.
I remember watching my colleague's face light up when she bit into one at the office party. She closed her eyes, and I realized that these weren't just cookies—they were little edible love letters. That's when I understood why people bake for people they care about: it's the only way to put time and intention into something someone will literally consume.
Ingredients
- All-purpose flour (2 ½ cups): This is your base, and measuring by weight if you can makes a real difference in consistency from batch to batch.
- Baking powder (½ tsp): Just enough lift to keep cookies tender without puffing them up like little cakes.
- Salt (¼ tsp): Don't skip this—it amplifies the strawberry flavor and balances the sweetness.
- Unsalted butter (¾ cup, softened): Room temperature butter creams properly and gives you that light, fluffy base that makes these cookies melt on your tongue.
- Granulated sugar (1 cup): The foundation of your dough's structure and sweetness; no substitutes needed here.
- Large egg (1, room temperature): Room temp matters because it incorporates smoothly and helps bind everything together.
- Vanilla extract (1 tsp): Use pure vanilla, not imitation—the flavor carries through even after baking.
- Almond extract (½ tsp, optional): This is the secret whisper that makes people ask what you did differently; include it if you want depth.
- Freeze-dried strawberries (¼ cup, finely ground): This is the soul of the recipe—these berries are concentrated flavor bombs that don't add moisture like fresh ones would.
- Milk (1–2 tbsp, as needed): Added gradually to adjust dough consistency, since freeze-dried berries can make dough a touch drier.
- Powdered sugar (3 cups, sifted): Sifting removes lumps and gives your icing a smooth, professional finish.
- Egg whites (2 large, or meringue powder alternative): Meringue powder is safer if you're uncomfortable with raw eggs, and it works beautifully.
- Lemon juice (½ tsp): A tiny bit of acid helps the icing set and adds a subtle brightness.
- Vanilla extract (½ tsp): Reinforces the vanilla note and smooths the icing flavor.
- Gel food coloring: Gel coloring doesn't add water like liquid does, so your icing won't become runny.
Tired of Takeout? 🥡
Get 10 meals you can make faster than delivery arrives. Seriously.
One email. No spam. Unsubscribe anytime.
Instructions
- Prepare Your Dry Ingredients:
- Whisk together flour, baking powder, salt, and finely ground freeze-dried strawberries in a medium bowl, making sure the berry pieces are evenly distributed so every cookie gets that strawberry flavor. This step prevents lumps and ensures your mix is uniform.
- Cream Butter and Sugar:
- In a large bowl with an electric mixer, beat softened butter and sugar for 2–3 minutes until the mixture looks pale, fluffy, and slightly increased in volume. This aeration is what keeps your final cookies tender instead of dense.
- Incorporate Wet Ingredients:
- Add the room-temperature egg, vanilla, and almond extract (if using) to the butter mixture, beating until everything is combined and the mixture looks smooth. Don't worry if it looks a little curdled at first—it'll come together once you add the dry ingredients.
- Bring the Dough Together:
- Gradually add your dry ingredient mixture to the wet ingredients, mixing on low speed just until everything is incorporated; be careful not to overmix or your cookies will be tough. If the dough seems too dry to come together, add milk one tablespoon at a time until it's soft but not sticky.
- Chill the Dough:
- Divide dough in half, flatten each half into a disc, wrap tightly in plastic wrap, and refrigerate for at least 1 hour. This resting time helps the dough relax and makes it much easier to roll and cut without sticking.
- Preheat and Prepare:
- Heat your oven to 350°F (175°C) and line your baking sheets with parchment paper. Having everything ready before rolling dough out prevents the dough from warming up while you're getting organized.
- Roll and Cut:
- On a lightly floured surface, roll one disc of dough to about ¼-inch thickness and cut out heart or Valentine shapes with a sharp cookie cutter. Work gently and use a dusting of flour on your cutter to prevent sticking.
- Space and Bake:
- Arrange cut cookies about 2 inches apart on your prepared baking sheets and bake for 8–10 minutes, watching until just the edges turn golden—this happens quickly. The centers will still look slightly soft when you pull them out, but they'll firm up as they cool.
- Cool Completely:
- Transfer baked cookies to a wire rack and let them cool completely before decorating; warm cookies will soften your icing. This is the hardest part because your kitchen will smell incredible and you'll be tempted to eat them immediately.
- Make Your Royal Icing:
- In a large bowl, beat your egg whites (or meringue powder mixed with water) with lemon juice until the mixture becomes frothy and lightens slightly in color. Gradually add sifted powdered sugar and vanilla extract, beating on low speed until the icing is smooth, glossy, and thick enough to hold peaks.
- Color Your Icing:
- Add gel food coloring a drop at a time, stirring gently until you reach your desired shade—gel colors are vibrant and won't thin your icing like liquid coloring would. You can also divide your icing into multiple bowls for different colors.
- Adjust Consistency:
- For flooding (smooth coverage), thin your icing with a few drops of water until it flows like honey; for piping outlines or details, keep it thicker by adding a bit more powdered sugar. Consistency is everything with royal icing, so adjust slowly and test on a spare cookie.
- Decorate with Care:
- Use piping bags fitted with small tips to pipe outlines first, then use a thinner consistency to flood the insides if desired, or simply spread a smooth layer on each cookie. Let each layer set before adding the next, or your colors will bleed together.
- Set and Store:
- Allow icing to cure completely—usually 2–4 hours depending on humidity—before stacking or packaging your cookies. Once fully set, they're sturdy enough to handle and gift with confidence.
 Save
Save There's something quietly powerful about handing someone a box of cookies you've made with your own hands, especially when they're this pretty. My sister told me later that half her coworkers asked for the recipe, and I realized that these small, strawberry-filled moments had somehow become the thing people remembered most about that day.
The Strawberry Flavor Story
The first time I used freeze-dried strawberries, I was skeptical—wouldn't they taste artificial or chalky? But the moment I ground them up, their concentrated berry perfume proved me wrong. These berries have had all their water removed through freeze-drying, which means the flavor is intensified rather than diluted. You're getting pure strawberry essence without any of the moisture that would make your dough soggy or cause your cookies to spread. It's like the difference between fresh strawberries and strawberry jam, except even more powerful. If you want to lean into the strawberry flavor even more, the note about adding ½ teaspoon of strawberry extract is worth trying, but use a light hand—it's potent.
Royal Icing Secrets
Royal icing intimidated me until I realized it's really just egg whites and powdered sugar having a conversation. The egg whites provide structure and airiness, the sugar provides bulk and sweetness, and the lemon juice gives it a tiny bit of snap. The magic happens in the beating—you're incorporating air, which is what gives royal icing its signature glossy finish and ability to harden into a crisp shell. If you're nervous about raw eggs, meringue powder (which is pasteurized egg white powder) works identically and tastes just as good. The consistency is everything: too thick and you can't spread it; too thin and it drips off your cookies. That's why starting with a thick base and then thinning with water for flooding is the safest approach.
Decorating Your Cookies Like You Mean It
I was convinced I couldn't decorate cookies until I stopped thinking of it as an art project and started thinking of it as play. Your piping bag doesn't need to be perfect—people will see intention and care, not precision. Start by piping a thin outline around each cookie shape to create a boundary; this takes just a few seconds and immediately makes your cookie look intentional. Once your outline sets (just a few minutes), you can flood the inside with a thinner icing, let gravity do the work, and use a toothpick to nudge the icing into corners. Or skip flooding entirely and just spread a smooth layer with a knife, which is honestly easier and looks beautiful.
- Keep a damp paper towel next to you while decorating to wipe icing off your piping tips between colors.
- If your icing is too thick, add water one drop at a time and stir gently; if it's too thin, sift in a tablespoon of powdered sugar at a time.
- Let icing set between layers or colors, or your design will muddy together into a swirl rather than staying crisp and defined.
 Save
Save These cookies are more than a recipe—they're an excuse to slow down and make something beautiful for someone you care about. Every time you pull a batch from the oven and watch your kitchen fill with that strawberry sweetness, you're doing something that matters.
Recipe Guide
- → How do freeze-dried strawberries affect the dough?
They add a concentrated strawberry flavor without adding moisture, ensuring the dough maintains proper consistency while infusing natural fruit taste.
- → Why is chilling the dough necessary?
Chilling firms the dough, making it easier to roll and cut while helping cookies retain their shape during baking.
- → Can I substitute meringue powder for egg whites in icing?
Yes, meringue powder mixed with water creates a safe alternative to egg whites, producing stable, glossy royal icing.
- → What causes royal icing to become glossy and crisp?
Whipping egg whites or meringue powder with powdered sugar creates a smooth mixture that dries to a shiny, firm finish.
- → How to adjust icing consistency for baking decoration?
Add small amounts of water to thin for flooding or more powdered sugar to thicken for piping outlines and details.
- → How long can these cookies stay fresh?
Stored in an airtight container at room temperature, they remain fresh for up to five days while preserving texture and flavor.