 Save
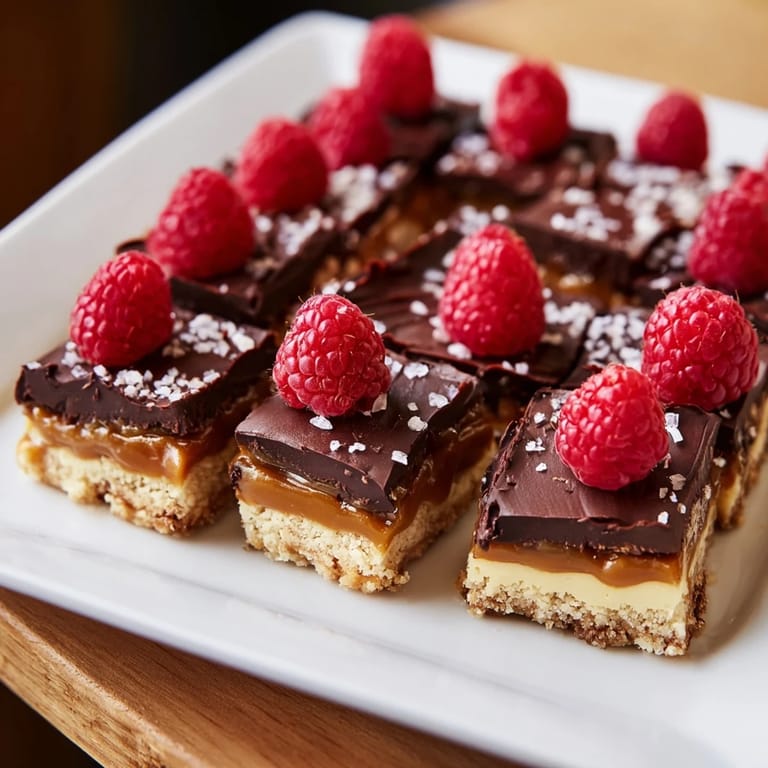
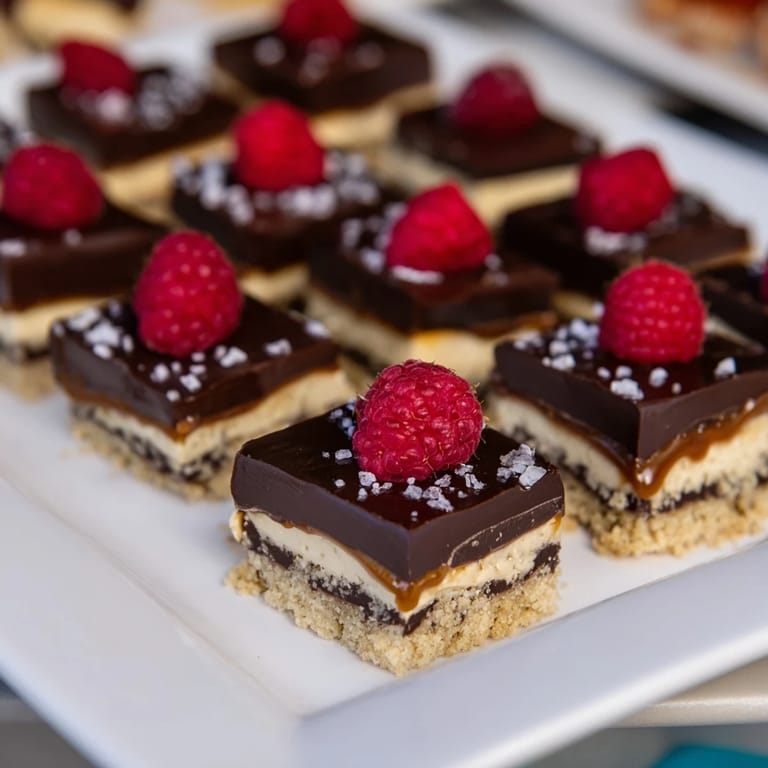
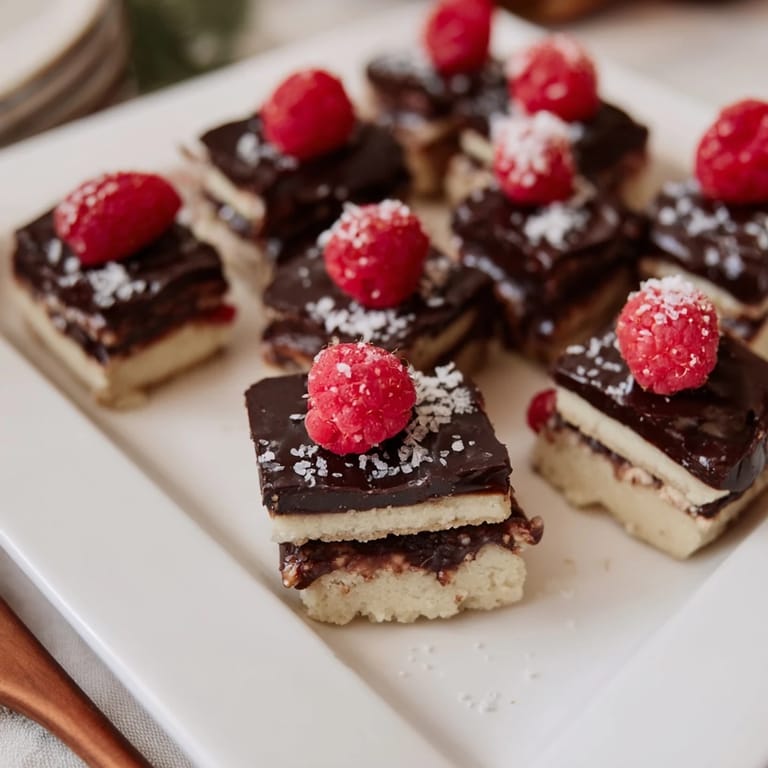
Save I discovered this dessert by accident at a dinner party where I'd dramatically overbaked everything else and needed something last-minute that didn't require a full oven. A friend mentioned she loved contrasting textures, and suddenly I was scrambling through my pantry, layering shortbread, chocolate, caramel, and cream cheese into a single pan like I knew what I was doing. Thirty minutes later, we were all cutting into these tiny squares, surprised by how each bite told a completely different story. It became the dish people asked for instead of the main course.
My neighbor once watched me slice these at a garden gathering and asked if I'd bought them from a fancy bakery. I didn't correct her until she'd taken her third piece and realized I'd genuinely made them in my kitchen that afternoon. She's been requesting them ever since, which is funny because I was convinced I'd invented something nobody would actually want to eat.
Ingredients
- Crisp shortbread cookies (80 g crushed): These form your crunchy anchor, but skip the delicate butter-cookie types that fall apart into dust—you want something with real structure that holds its bite.
- Unsalted butter (30 g melted): Just enough to bind the crumbs without making them greasy, which ruins the crispy contrast.
- Cream cheese (80 g softened): This becomes your tangy, pillowy layer, and it must be at room temperature or it won't smooth out properly no matter how hard you beat it.
- Powdered sugar (30 g): Keeps the cream cheese sweet without weighing it down with granules that don't dissolve.
- Vanilla extract (1 tsp): A quiet backbone that ties the soft layer together without announcing itself.
- Dark chocolate (100 g chopped): Use something you'd actually eat on its own; mediocre chocolate makes a mediocre ganache, even with heavy cream involved.
- Heavy cream (60 ml): Just enough to create that glossy, spoonable texture without turning the chocolate into soup.
- Salted caramel sauce (80 g): Store-bought is perfectly fine here, and honestly saves you from the stress of watching sugar reach the exact right temperature.
- Flaky sea salt: A pinch over the caramel squares brightens everything without making it taste like the ocean.
- Small raspberries (16 optional): A gentle garnish that adds tartness to the plain crunchy squares, though they're beautiful on their own.
Tired of Takeout? 🥡
Get 10 meals you can make faster than delivery arrives. Seriously.
One email. No spam. Unsubscribe anytime.
Instructions
- Build your foundation:
- Mix the crushed cookies with melted butter until it feels like wet sand, then press it firmly and evenly into your baking dish lined with parchment paper. The pressure matters here—a loose crumb layer will shift when you fill the other squares. Let it chill for 15 minutes so it firms up.
- Create the soft layer:
- Beat your room-temperature cream cheese with powdered sugar and vanilla until it's completely smooth and there are no grains of sugar visible. If your mixer starts to strain, the cheese wasn't warm enough; set it out a bit longer next time.
- Make the chocolate layer:
- Heat your cream just until small bubbles appear around the edges, pour it immediately over your chopped chocolate, and wait two full minutes before stirring. This patience is what transforms it into something silky instead of grainy.
- Gather your caramel:
- If you're making it from scratch, do that now so it's ready when you need it. If you're using store-bought, just give it a stir so it's spreadable.
- Mark your grid:
- Remove the chilled crust from the fridge and use a ruler and sharp knife to lightly score a 4x4 grid onto the surface. Don't cut all the way through—just light guide lines so you know where each square goes.
- Fill the checkerboard:
- Spoon your four fillings into their designated squares, arranging them so that matching textures never sit next to each other. Leave four squares as naked crust, then top them with raspberries if you want that pop of tartness. Use an offset spatula to spread things smoothly, or just let the layers sit slightly imperfect—it's part of the charm.
- Chill everything together:
- Let the whole assembled dessert rest in the refrigerator for at least 30 minutes so the different layers set properly and won't slide around when you cut.
- Slice with intention:
- Use a sharp knife dipped in hot water and wiped clean between cuts to get clean edges. The warmth of the knife helps it glide through the layers without dragging things around.
 Save
Save I made these for my sister's book club, and they sparked an actual conversation about what texture each person loved most, which felt silly until everyone realized they were genuinely excited about dessert for the first time in months. That small moment of joy from four different textures in one bite reminded me why I started cooking in the first place.
Playing with Texture Combinations
The magic of this dessert lives in the contrast—your mouth expects one thing and gets something completely different in the next square. Once you understand that principle, you can start swapping textures without losing the concept. Try a slightly salted white chocolate instead of dark, or add a thin layer of crushed candied nuts between the cream cheese and crumb layers. The structure stays the same, but the experience shifts entirely.
Storage and Make-Ahead Strategy
These actually improve slightly after a day in the fridge as the flavors have time to know each other, and the cold actually makes cutting cleaner and easier. You can prepare the crust and chill it a full day ahead, then fill and assemble just a few hours before serving. If you want to get ambitious, you can even make the chocolate ganache and cream cheese filling the day before and store them separately, then assemble everything in the morning.
Beyond the Basic Recipe
Once you've made this a few times and feel confident with the grid system, the real fun starts. Imagine a citrus-forward version with lemon curd instead of chocolate, or a coffee lover's variation with a bitter espresso ganache. The framework is just four squares in different arrangements—everything else is your kitchen, your taste, your mood.
- Toast your nuts before adding them to the crunchy layer so they actually taste like nuts instead of just being crunchier than cookies.
- If your caramel is too thick to spread, warm it gently over low heat for just a minute, stirring constantly so it stays smooth and doesn't separate.
- Let your scissors or knife soak in warm water for a moment before cutting chocolate layers; warmth is your best tool for clean edges.
 Save
Save These tiny squares prove that entertaining doesn't mean complicated, and that sometimes the best desserts are the ones that surprise you with every bite. Make them when you want people to slow down and actually think about what they're eating.
Recipe Guide
- → How do I create the checkerboard pattern?
Lightly score the chilled base into a 4x4 grid and carefully fill each square with alternating layers to ensure no two adjacent squares share the same texture.
- → Can I substitute shortbread cookies?
Yes, crushed graham crackers or a mix with toasted nuts add a similar crunchy texture and nutty flavor.
- → What’s the best way to make the ganache silky?
Heat the cream until just simmering, then pour over chopped dark chocolate. Let it sit briefly before stirring gently until smooth and glossy.
- → How should I store the finished dish?
Keep chilled in the refrigerator to maintain firmness and freshness until ready to serve.
- → Are there any suggested pairings?
This layered treat pairs beautifully with sweet sparkling wines like Moscato d’Asti or Riesling to enhance the flavors.